Eclipse Maven Multi Module
In this tutorial we explain steps to create a Maven Multi Module Project using Eclipse Maven Plugin (M2E) Wizard.
The main steps are
- create top level maven project
- add modules to top level project
Create Top Level Maven Project
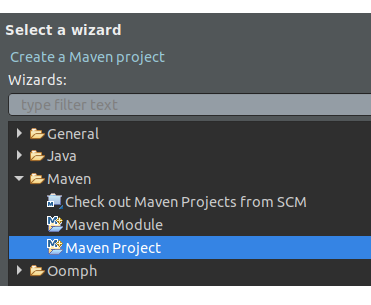
Open Maven Project Wizard with File → New → Others → Maven → Maven Project.
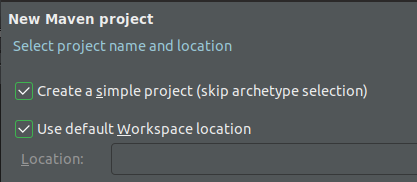
The wizard opens Select project name and location window. Check the Create a simple project checkbox to create a bare bone project and click Next.
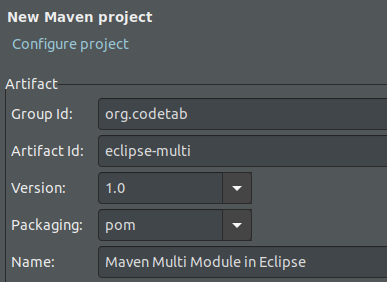
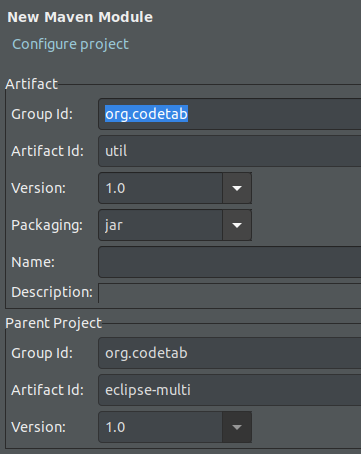
Next in the Configure Project window, enter Group ID as org.codetab, Artifact ID as eclipse-multi and for packaging field select pom. For a normal project the packaging type is jar or war, but for a multi module top level project it should be pom.
Finally, click Finish to create the project. At this point the top level project, also called as parent project, contains just the top level pom.xml.
Open pom.xml and add following properties.
eclipse-multi/pom.xml
    <properties>
        <project.build.sourceEncoding>UTF-8</project.build.sourceEncoding>
        <maven.compiler.source>1.8</maven.compiler.source>
        <maven.compiler.target>1.8</maven.compiler.target>
    </properties>
We add these properties in the top level POM so that all its modules inherits them. This also ensures that build path of all modules uses Java 1.8 library instead of default 1.5.
Add Modules
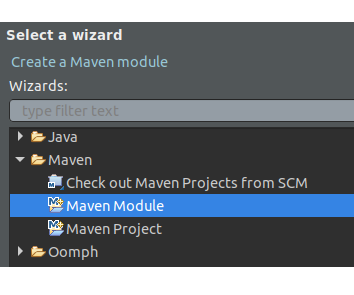
To add modules, select eclipse-multi project in the Project Explorer and right click to open context menu. From the context menu, open Maven Project Wizard with New → Others → Maven and select Maven Module and click Next.
In the Enter Module Name window, check Create Simple Project checkbox and enter the name for the module as api and click next. This brings up Configure Project window. Wizard auto fills module and parent project coordinates. For modules, the packaging type is either jar or war.
Click finish to create the module. The the module folder get created in the parent project folder. We can repeat the same procedure to add more modules. The modules can be added either to top level folder or to any module. When module is added to another module then project becomes hierarchical multi module project.
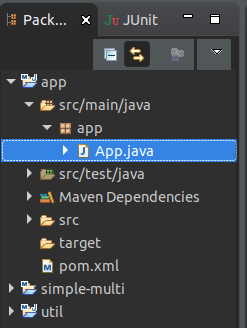
The project structure is as shown in the screenshot.
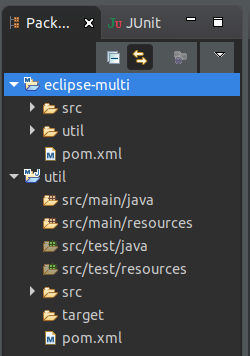
The util module is shown in two places - one under eclipse-multi folder and one outside. If we open eclipse workspace in File Manager the util folder exists only in eclipse-multi folder. For convenience, Eclipse shows modules as separate entries in Project Explorer which are used for development.
For more information on Maven Multi Module and sample project, see Multi Module Project Tutorial
Import Maven Multi Module
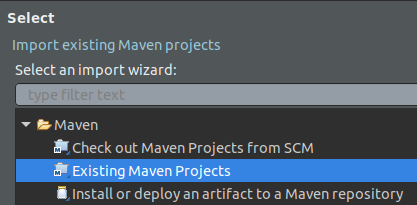
Alternatively, we can also import existing Maven Multi Module project. To import the Simple Maven Project, explained in above tutorial, download the example code from GitHub Maven Examples and extract it (or clone) to Eclipse workspace. In Eclipse, open import wizard with New → Import and in Select window choose Existing Maven Project
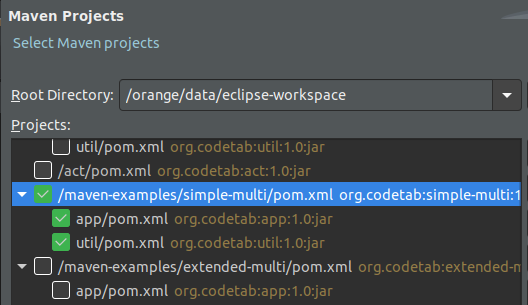
Choose workspace as Root Directory in Select Maven Project window, which displays all Maven projects in your workspace. First, Deselect All and then select Simple Multi Module Project as shown in next image.
Click Finish to import the project. The Simple Multi Project and its modules are displayed in Project Explorer.
We can also use Check out Maven Project from SCM in Import wizard to directly import the project from GitHub. For that, install M2E Git Connector from M2E marketplace.
How to run Multi Module Project
We can use Maven build option to run the multi module. To do that, first right click on top level project and select Run As → Maven Install and after project installed in local repository again select Run As → Maven Build and in run configuration screen enter exec:java -pl <module that has main class> -Dexec.mainClass=<main class> in Goals field and then click run.
This is cumbersome, but fortunately there is a shortcut. All we have to do is right click on the main class file and open the context menu and choose Run As → Java Application. Eclipse links all the modules and run the application straight away.