Simple Maven Project
In the previous chapter we introduced Apache Maven and installed it. In this chapter, we create a simple Maven project and build it with Maven.
Maven comes with wizard to create various type of projects, but for now we are not going to use Maven to create project for us. Instead, we hand code the project as beginners can learn more from the process.
Work Dir
Throughout the guide, we use a work directory to run Apache Maven examples. The work directory is some location like $HOME/work or C:Usersxwork, but you are free to choose any other location. Throughout the guide, we use phrases such as create a file, add pom.xml, run Maven etc., which simply means carryout that task from work directory. When a task is to be done from some other folder then we will explicitly say so.
Create Project
Let’s start with the Simple Maven Project named Simple App. Create project folder in work directory and then add source folders.
Linux

$ mkdir simple-app
$ cd simple-app
$ mkdir src/main/java -p


Windows

C:Usersxwork> mkdir simple-app
C:Usersxwork> cd simple-app
C:Usersxwork> mkdir srcmainjava
In Maven, Java source files are placed under src/main/java directory
and it is a custom enforced by Maven.
Note
Windows user can use Notepad and Linux users can use vi, nano or any other editor to add or edit the files.
For sake of brevity, here onwards, we present only the commands for Linux. As commands are simple ones such as mkdir, cp, cd etc., users should not find it difficult to adapt them for Windows OS.
Next, create package named com.xyz in it.
$ cd src/main/java
$ mkdir com/xyz -p
$ cd com/xyz
Add a Java class App.java to src/main/java/com/xyz folder with
following contents.
simple-app/src/main/java/com/xyz/App.java
package com.xyz;

public class App {

        public static void main(String[] args) {
                System.out.println("Hello World!");
        }

}
The App outputs just a greeting and nothing more. In the examples, we use simple and trivial code so that we can focus more on Maven rather than the project.
Add POM
Finally, add Maven Project Object Model (POM) file named pom.xml to
the top level folder of the project i.e. to the simple-app
folder.
simple-app/pom.xml
<project xmlns="http://maven.apache.org/POM/4.0.0" xmlns:xsi="http://www.w3.org/2001/XMLSchema-instance"
        xsi:schemaLocation="http://maven.apache.org/POM/4.0.0 http://maven.apache.org/maven-v4_0_0.xsd">

        <modelVersion>4.0.0</modelVersion>

        <!-- project coordinates -->
        <groupId>com.xyz</groupId>
        <artifactId>simple-app</artifactId>
        <version>1.0</version>

</project>
Maven Project Object Model (POM) is sort of build file, but much more. The POM is where a project’s identity and structure are declared, builds are configured, and projects are related to one another. The presence of a pom.xml file indicates that project uses Maven as project management tool.
At this stage, we use a bare minimum POM to define the project. The elements in pom.xml are:
project - the top level or root element of the POM.
modelVersion - POM model to use and it should be set to 4.0.0
groupId - project’s group id and normally, it is organization name which owns the project such as org.apache, org.springsource etc.,
artifactId - name of the project such as commons-lang, junit etc.,
version - artifact version.
The trio - groupId, artifactId and version - is known as Maven Coordinates. The coordinate provides an unique identity to a Maven project and every project should have them. The coordinates should be unique and no two Maven projects can have same coordinates. These three values form the project’s fully qualified artifact name and the fully qualified name of our simple maven project is com.xyz:simple-app:1.0.
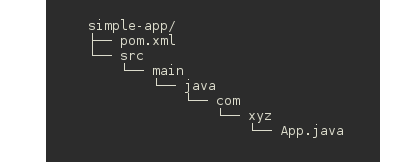
At this point, the simple-app project directory structure is as shown in the figure.
Ellipsis
As we progress through Maven, the pom.xml becomes lengthy and it would be difficult to present the complete listing each and every time.
To shorten the listing, we use Ellipses (. . .) in the listing.
        ...
        <!-- project build -->
        <build>
          <filters>
              <filter>src/main/filters/default.properties</filter>
          </filters>
        ...
To run the examples, add the snippet between the ellipses to the existing pom.xml or other files at appropriate place.
Build Project
It’s time to run Maven and use it compile simple-app.
Maven downloads core plugins during initial run. So, enable Internet
connection, and execute the Maven from the top folder of the project
where pom.xml exists i.e. from simple-app folder.
$ cd simple-app
$ mvn compile
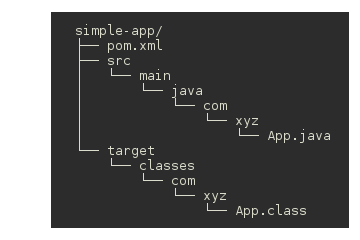
Maven downloads some of core plugins (around 6MB) and then compile the
project. It creates a build directory called target in the top folder
and complied class files goes into it. At this point, the simple-app
folder is as shown in the screenshot.
Maven core, installed in the previous chapter, is just under 10MB and
reason for such a small core is, Maven delegates the functionality such
as compile,test etc., to plugins. On first run of command mvn compile,
Maven downloads Apache Resources Plugin and Apache Compiler
Plugin from its central repository and saves it in the local
repository and then uses the Complier Plugin to compile the project. On
subsequent invocation of the command, it finds the Complier Plugin in
local repository and uses it to execute the command.
Maven CLI
The command line interface (CLI) of Maven is mvn, which is used to
build, manage and also to interact with Maven. Everything in Maven is
done through mvn and it’s always executed from the top folder of the
project that contains the pom.xml.
Let’s now package the our app for distribution with Maven.
$ mvn package
Again, since it’s first run of package command, Maven downloads Maven
Jar Plugin and some others (around 4MB) from central repository and
then, it completes the packaging of the project by creating a jar file
named simple-app-1.0.jar in target folder.
Let’s check whether our app is built properly.
$ java -cp target/simple-app-1.0.jar com.xyz.App
If app runs without any error and outputs Hello World! message, then we have build our first project with Maven.
We can now remove the build directory with following command.
$ mvn clean
Again, Maven has to delegate the cleaning task to a plugin called Apache Clean Plugin and to do that, it downloads the plugin (around 2MB) and then, clean plugin deletes the build directory i.e. target and its subdirectories.
We can tryout compile, package again to rebuild the project, and this time, we can do so without Internet connection as all required plugins are there in the local directory.
Resource Encoding
In the build output, you might have observed a warning
[WARNING] File encoding has not been set, using platform encoding UTF-8,
i.e. build is platform dependent!
To overcome the issue and make build platform independent, modify pom.xml and set project.build.sourceEncoding property to UTF-8 as shown in the listing.
simple-app/pom.xml
        ...
        <modelVersion>4.0.0</modelVersion>

        <!-- set encoding to make build platform independent -->
        <properties>
                <project.build.sourceEncoding>UTF-8</project.build.sourceEncoding>
        </properties>

        <!-- project coordinates -->
        ...
Maven Repository
In the previous section, we executed Maven commands, it downloaded the
core plugins from Maven central repository such as https://repo.maven.apache.org and stores or caches them in a local repository.
Apart from plugins, Maven also stores dependencies in the local repository. For example, if our project depends on Apache Commons Lang and when project is built, Maven downloads artifacts of Commons Lang from the central repository and caches them in the local repository.
The local repository is normally located in Users home directory under a
folder named .m2. In Linux, it defaults $HOME/.m2 and in Windows, it
is C:Documents and Settings{username}.m2. Beyond this, we need not
bother much about the repository and its contents.
In the next chapter, we go through Maven Dependency Management and add some dependencies to our Simple App.