Chapter 2. Create Project
In this chapter, we are going to create a plain GWT Project and then add other components, those makes up a GWT project, by hand.
Create barebone GWT project
GWT project can be created in two ways, command line tool webAppCreator or Eclipse New Web Application Project wizard .
Let’s use New Web Application wizard to create GWT project. Choose

Project Name - fins
Package - in.fins
Use Google Web Toolkit - select
Use Google App Engine - deselect
Google App Marketplace - deselect
Generate Sample Code - deselect
Short Package Names
Short Package names are easy to read and reduce clutter in the sample code and Package Explorer, but in real project use proper package names.
In part III when we deal with deployment, Google App Engine (GAE) will be enabled and for now Google Web Toolkit (GWT) feature is sufficient.
As we are going to add GWT files manually we have deselected Generate Sample Code option. This will provide better clarity about GWT project layout and files.
Wizard creates directory structure and files as show in the figure.
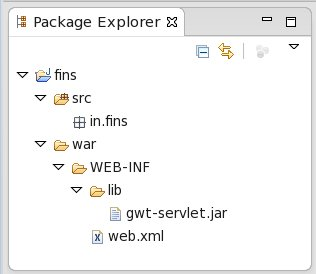
Dir and files are just like any other web app structure with standard
fixtures like WEB-INF and web.xml. Wizard has placed gwt-servlet.jar in
WEB-INF/lib dir so that our project can use GWT and it adds this jar
to build path of the project.
Let us add other pieces of GWT to our barebone GWT Project.
Module
A module bundles together all the configuration settings of GWT project like inherited modules, an entry point class, source and public paths etc. To add a GWT module to the project select package in.fins and then choose File → New → Module. In New GWT Module window enter module name as fins and using Add button inherit following modules, in addition to com.google.gwt.user.User
com.google.gwt.user.theme.clean.Clean – use Clean theme
com.google.gwt.uibinder.UiBinder – use UiBinder module
This will add module file fins.gwt.xml to src/in/fins dir and
creates new package in.fins.client
in.fins/fins.gwt.xml
<module>
  <inherits name="com.google.gwt.user.User" />
  <inherits name="com.google.gwt.user.theme.clean.Clean" />
  <inherits name="com.google.gwt.uibinder.UiBinder" />
  <source path="client"/>
</module>
source element indicates that files in path client are translatable
source and they are to be translated into javascript. Edit fins.gwt.xml
and add rename-to=”fins” attribute to module element.
<module rename-to="fins" >
  ....
Module rename
Web app will not run if this step is missed. GWT compiles java classes, found in directories designated as source, to javascript and creates a file named <<module_name>>.nocache.js and places it in war/<<module_name> dir. rename-to shorten the lengthy module name
without the rename-to element, module name will be
in.fins.finsand path of js file iswar/in.fins.fins/in.fins.fins.nocache.jsuse of rename-to=“fins”, results in module name
finsand js filewar/fins/fins.nocache.js
HTML Page
To add HTML Page to the project, select project and then choose File
→ New → HTML Page. In HTML Page window enter File name as
Fins and add module fins using Add button. As we are not
going to use history feature in this project deselect Support for
browser history . This will add HTML file Fins.html to war dir.
Entry Point class
To add Entry Point class select in.fins.client package and then choose
File → New → Entry Point Class. In Entry Point Class
window enter Class Name as Fins and click Finish. This will
create Fins.java and adds an entry-point element to fins.gwt.xml.
Modify Fins.java to add a GWT Label to display a test string.
in.fins.client/Fins.java
import com.google.gwt.user.client.ui.Label;
import com.google.gwt.user.client.ui.RootPanel;

....

public void onModuleLoad() {
      RootPanel root = RootPanel.get();
      root.add(new Label("Test Label"));

....
With required GWT components in place Fins is ready display the test
label. Choose 
As explained earlier, source element in fins.gwt.xml indicates
that files in in.fins.client are translatable source. On first run,
GWT translates objects in these files into a javascript file named
fins.nocache.js. and places it in war/fins dir. On subsequent runs,
modified files are recompiled and fresh files are served to the browser.
Any changes to client side code don’t require a restart of browser or
server as the application reloads with just browser refresh.
GWT Developer Plugin
To use GWT Development Mode features, GWT Developers Plugin has to be installed for the browser which is available for Safari, Firefox, IE, and Chrome. If Plugin is not installed in your browser, then you will get a prompt for its installation when you first access the application.
Eclipse Templates
Client side files frequently use some boiler plate code like logging and UIBinder initialization. Instead of typing them each time, we can add them to templates and use auto complete feature to insert them to our classes. To add templates choose Window → Preferences → Java → Editor → Templates and use New button to add following templates
UIBinder
Name -
uibinderContext -
javaAuto insert -
selectPattern
interface ${enclosing_type}Binder extends UiBinder<Widget, ${enclosing_type}> {}
private static UiBinder<Widget, ${enclosing_type}> binder =
           GWT.create(${enclosing_type}Binder.class);
Logging
Name -
logger utilContext -
javaAuto insert -
selectPattern
private static final Logger log = Logger.getLogger(${enclosing_type}.class.getName());
In Java files, all that is required is to type uib or logge and press Ctrl+Space to auto complete.
Forward Pointers
Organizing Projects - To know more about structure of GWT Project refer GWT Development Guide - Organize Projects .
Development Mode - Compile & Debug section of Development Guide provides good insight into development mode and compile process.