Manage Data
Fins uses DAO Layer and JDO for data access and it is ready to interact with App Engine datastore without any further changes. But as of now, we don’t have any data in App Engine datastore. Earlier, we used RStore to load data to HSQLDB, but this is of little use as it is not possible to move this data to App Engine datastore. Let’s explore the ways to load data into App Engine datastore.
There is couple of option. App Engine Python SDK comes with appcfg.py which has features to upload data. Unfortunately, Java SDK doesn’t support this feature. Even then, appcfg.py has certain limitations like it supports only Master/Slave datastore and not High Replication Datastore, configuration and class mapping files are in python and finally it more suited for bulk uploads rather than for incremental upload. The last one is the deal breaker as we like to upload incremental data periodically.
Another option is to create some sort of web service on GAE for App Engine data upload, but we are hesitant to go for this strategy as this requires additional application to act as client.
Instead, it is better to have a menu in Fins itself to upload the XML data to App Engine. Coding would be easy as we may reuse certain components like XML parsing etc., from RStore. Even though the task is quite simple, surprising it throws quite a bit of challenges which are unique to App Engine and in the process, provides an opportunity to explore a handful of GWT and App Engine features like FormPanel, FileUpload, MemCache, Tasks, Queue and backends.
Our initial tries revolved around following logic.
upload the XML file using GWT FileUpload widget.
on server side, parse XML and create a list of Symbol.
loop through list and persist the Symbol one by one.
This simple logic should work perfectly well in any normal web server, but its implementation on App Engine, throws some serious errors because restrictions imposed by App Engine. Let’s broach these restrictions before attempting to rework the logic.
App Engine Restrictions
App Engine runs the app in a secure sandbox and provides little access to underlying operating system. Secure sandbox environment imposes following restrictions.
applications are allowed to read files that are uploaded with the application code, but not allowed write to the file system, and to persist data between requests, apps must use App Engine services like datastore, memcache etc.,.
application code only runs in response to a web request and in case, must return response data within 60 seconds, and request handler cannot spawn a sub-process or execute code after the response has been sent. Beyond this limit, server terminates the process and returns an error code to the user. The request timeout is dynamic and may be shortened if a request handler reaches its timeout frequently to conserve resources.
App Engine doesn’t allow the app to save uploaded file to file system and next best thing is to persist the file content to datastore as a Blob object for later retrieval. App Engine imposes size restriction of 1MB for Blob, and we will not be able to handle files larger than this. App Engine supports Blobstore service to handle files larger than 1MB which is mainly used for serving the files. Even though Blobstore is suitable for our purpose, it consumes unnecessary resources like datastore writes etc..
Second restriction is that request has to be finished within 60 seconds else App Engine returns an error. This time limit is sufficient to upload XML file with data for about ten Symbols. We should keep these restrictions in mind while designing apps for App Engine.
In addition, one has to be careful about the resource utilization as App Engine imposes quota for various resources like instance hours, backend hours, bandwidth, datastore writes and reads etc.
Considering all these aspects, one of the efficient ways to upload data is as follows.
zip the XML file on local system to reduce the upload traffic.
upload the zip using GWT FileUpload and FormPanel widgets.
on server side, a servlet handles the uploaded file and unzips XML content into a byte array and then parses it to create a list of Symbols. User may upload multiple files in a session and all parsed data accumulates in the list.
once all the files are uploaded, user sends a request to servlet to move the symbols to App Engine’s MemCache. This step moves the symbols from a private memory area of the servlet to apps global area which is available to all processes or services.
after symbols are cached, user initiates a RPC call which gets the symbols from MemCache one by one and creates datastore insert task and adds them to App Engine task queue. It completes the request by informing the user about the number of tasks pushed to App Engine task queue.
App Engine processes these insert tasks and executes the tasks in a separately configured Backend instance of the app where each task persists one symbol into App Engine datastore. There is no 60 seconds timeout for queues and tasks as they run in background.
Rest of the chapter implements this logic to add a menu option to Manage Data that works seamlessly, in both App Engine as well as in generic app servers.
11.1. Upload XML Data
In this section, we going to add a new content page to Fins which allows
the user to upload zip files to the server. On the client side, we
design a custom widget, UploadPanel, with GWT FileUpload and
FormPanel widgets. On the server, UploadService, handles the upload
request and parses the data into a list of symbols.
DataStore content page
Its been a long time since we did anything on the client side and
designing the content page, DataStore, recaps some of things we
learned earlier.
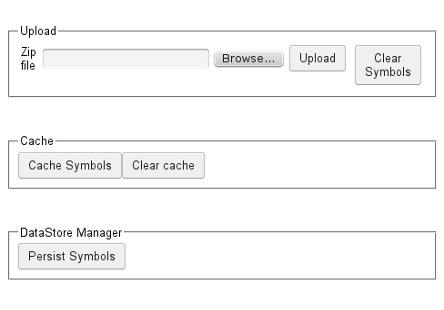
Figure 11.1. DataStore content page
DataStore content page contains three widgets - UploadPanel,
CachePanel and DataStorePanel. Through UploadPanel, user may upload
multiple zip files which are parsed by server to a list of Symbols. Once
upload is completed, user clicks Cache Symbols button to cache the
Symbols and then clicks Persist Symbols button to persists the Symbols
to datastore.
First thing is to add a menu option, DataStore, to MenuBar.
in.fins.client.widget/MenuBar.ui.xml
  <g:stack>
          <g:customHeader size='1.8'>
                  <f:MenuHeader text="Manage" imageResource="{resource.spanner}" />
          </g:customHeader>
          <g:LayoutPanel>
                  <g:layer left='0.5em' width='10em' top='0.5em' height='3em'>
                          <f:MenuItem contentName="DataStore" text="DataStore"
                                  imageResource="{resource.dollar}" />
                  </g:layer>
          </g:LayoutPanel>
  </g:stack>
ContentPanel.onMenuSelection() method adds a tab, with DataStore
widget as content, when user clicks the menu.
in.fins.client.widget/ContentPanel.java
        @Override
        public void onMenuSelection(MenuEvent menuEvent) {
                String contentName = menuEvent.getMenu();
                if (contentName.equals("Snapshot")) {
                        addTab(contentName, new Snapshot());
                }
                if (contentName.equals("DataStore")) {
                        addTab(contentName, new DataStore());
                }
        }
During development, just for convince, we make DataStore as the home
page in class in.fins.client.content.FinsShell.
DataStore widget uses LayoutPanel as root widget and within which a
VerticalPanel holds other widgets.
in.fins.client.content/DataStore.ui.xml
<!DOCTYPE ui:UiBinder SYSTEM "http://dl.google.com/gwt/DTD/xhtml.ent">
<ui:UiBinder xmlns:ui="urn:ui:com.google.gwt.uibinder"
        xmlns:g="urn:import:com.google.gwt.user.client.ui" xmlns:f="urn:import:in.fins.client.widget">
        <g:LayoutPanel>
                <g:layer left='10%' width='60%' top='10%' height='60%'>
                        <g:VerticalPanel spacing="40">
                                <f:UploadPanel />
                        </g:VerticalPanel>
                </g:layer>
        </g:LayoutPanel>
</ui:UiBinder>
DataStore.java initializes the UI binder. We are free to add any other widgets to DataStore widget by modifying its UIBinder file and initially, it contains UploadPanel, a custom widget.
UploadPanel
This widget contains two components, form to upload the file and a button to clear the symbol list.
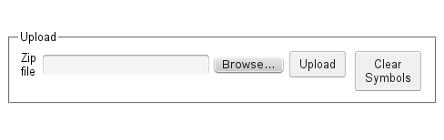
Figure 11.2. UploadPanel
in.fins.client.widget/UploadPanel.ui.xml
<g:CaptionPanel captionText="Upload">
        <g:HorizontalPanel>
                <g:VerticalPanel>
                        <g:FormPanel ui:field="uploadForm" action="/upload">
                               ....

                        </g:FormPanel>
                </g:VerticalPanel>
                <g:VerticalPanel>
                        <g:FormPanel ui:field="clearListForm" action="/upload">
                                     ....

                        </g:FormPanel>
                </g:VerticalPanel>
        </g:HorizontalPanel>
</g:CaptionPanel>
At the top, it has a CaptionPanel within which a HorizontalPanel holds
two FormPanels. FormPanel is a panel that warps its content in HTML
<FORM> element. The first FormPanel is for file upload and the second
one to clear the list, and they both invoke UploadService servlet on
submission. While using multiple FormPanel in a widget, it is important
to place them in separate panels else form submission doesn’t happen
properly. For example, following UI declaration doesn’t work as desired
as multiple forms are placed in a panel.
<g:CaptionPanel captionText="Upload">
        <g:HorizontalPanel>
                        <g:FormPanel ui:field="uploadForm" action="/upload">
                               ....
                        </g:FormPanel>
                        <g:FormPanel ui:field="clearListForm" action="/upload">
                                     ....
                        </g:FormPanel>
        </g:HorizontalPanel>
</g:CaptionPanel>
Within uploadForm, we use a Grid to place GWT FileUpload widget.
in.fins.client.widget/UploadPanel.ui.xml
....

<g:FormPanel ui:field="uploadForm" action="/upload">
        <g:Grid>
                <g:row>
                        <g:customCell>
                                <g:Label text="Zip file" />
                        </g:customCell>
                        <g:customCell>
                                <g:FileUpload name="uploadFormElement" />
                        </g:customCell>
                        <g:customCell>
                                <g:Button text="Upload" ui:field="uploadButton" />
                        </g:customCell>
                        <g:customCell>
                                <g:Hidden name="action" value="uploadAndParse" />
                        </g:customCell>
                </g:row>
        </g:Grid>
</g:FormPanel>
GWT Hidden widget represents a hidden field in an HTML form, and we
use this to distinguish the forms on the server side.
Upload.java handles Form encoding, submission and response of both
forms.
in.fins.client.widget/Upload.java
        public UploadPanel() {

                initWidget(uiBinder.createAndBindUi(this));
                uploadForm.setMethod(FormPanel.METHOD_POST);
                uploadForm.setEncoding(FormPanel.ENCODING_MULTIPART);

        }

        @UiHandler("uploadButton")
        void onUploadClick(ClickEvent event) {
                uploadForm.submit();
        }

        @UiHandler("uploadForm")
        void onUploadFormSubmitComplete(SubmitCompleteEvent event) {
                StatusEvent se = new StatusEvent(event.getResults());
                EventBus.get().fireEvent(se);
        }
Encoding is set to ENCODING_MULTIPART which is essential for file
upload and submit method is set to POST. ClickEvent handler is
attached to the button which on click submits the form. To handle the
response, SubmitCompleteEvent is attached to the form, and this
handler, displays the response in the status bar.
Second form, clearListForm, is to clear the symbol list, and its design is similar to the uploadForm.
UploadService
UploadService extends HttpServlet. It uses Apache Commons FileUpload
and IOUtils to handle the upload content. HttpServlet.doPost() method
handles the upload as follows.
uses Apache Commons
ServletFileUploadto get the form fields and file contents.if it is file, it uses
IOUtils.toByteArray()method to convert the content to a byte[] which is nothing but uploaded zip file.if the value of the hidden field action is uploadAndParse, then call
uploadAndParse()method.if the hidden field’s value is clearList, then call
clearSymbols()method.
Zip file can contain multiple files and processZipFile() method gets
ZipEntry, from byte[], one by one and unzip the entry into XML. For
each entry, it calls parseSymbols() method, which uses SymbolParser
to parse the XML into Symbol. SymbolParser is the same one which we
used in RStore. Symbols accumulate in a List, and if Symbol with the
same name exists in the list, then mergeSymbol() method merges the
Symbol with the existing Symbol using SymbolHelper.updateSymbol()
method. Method clearSymbols() clears the list.
Servlet-mapping in web.xml maps FormPanel to UploadService.
war/WEB-INF/web.xml
...
        <servlet>
                <servlet-name>uploadService</servlet-name>
                <servlet-class>in.fins.server.service.UploadService</servlet-class>
        </servlet>

        <servlet-mapping>
                <servlet-name>uploadService</servlet-name>
                <url-pattern>/upload</url-pattern>
        </servlet-mapping>