OpenShift
OpenShift is a cloud computing platform as a service (PaaS) product from Red Hat. Unlike App Engine which restricts it self to select set of languages and databases, OpenShift gives you a wide range of choice programming languages including Java, Ruby, PHP, Node.js, Python and Perl. It supports variety of databases like MySQL, MangoDB, PostgreSQL etc.,
OpenShift also comes with a free account which allows you to host three applications. While there is detailed quota on resources, free account limits the resources like memory, and storage.
This chapter explains the OpenShift setup and shows how to create, develop, build and deploy applications to OpenShift. In the previous chapters, while Fins was modified to run on App Engine we took care to keep the changes platform independent and no further changes are required at code level to deploy the Fins on to OpenShift. This chapter is more about stuffs like setup, configure, build, deploy, and it is light on code.
12.1. Setup
This section explains the steps to create a free OpenShift account and OpenShift setup to deploy GWT application.
Create OpenShift account
First task is to create a free account on OpenShift.
go to OpenShift and choose Sign up for Free. In the Sign Up page, enter a valid Email. After entering other details, Sign up to receive verification mail. Complete the verification process.
once verification is over, go to Sign Up page, and login using Sign In link.
on login, accept the Legal Terms to complete the account creation, and OpenShift displays the Management Console.
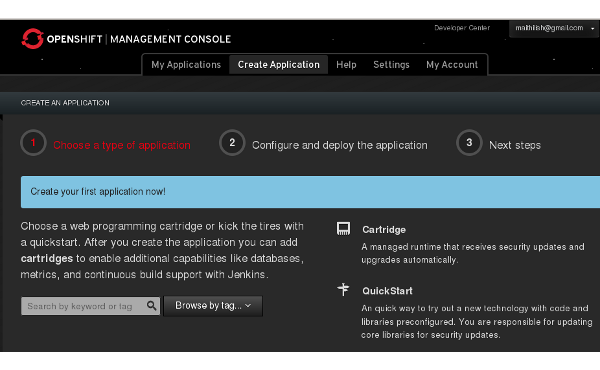
Figure 12.1. OpenShift Management Console
Web console lists instant applications - WordPress, Drupal, and Java servers - JBoss, Tomcat and some of the popular frameworks. It also contains many quickstarts, which are preconfigured code and libraries to try out a set of technologies.
We leave the web console for the time being as we are going to use a client tool to create and manage our application.
Install client tools
OpenShift client tool is CLI tool set to manage the OpenShift account and applications. Client tools known as RHC are built and packaged using the Ruby.
Here, we show how to install and setup RHC on Fedora systems. For other systems, refer Installing OpenShift RHC Client Tools .
RHC requires Ruby 1.8.7 or higher. It also requires Git to synchronize the local application source and OpenShift application. All these comes as a Ruby Gem package.
$ sudo yum install rubygem-rhc
This installs Ruby, Git, RHC and other dependencies required to run the OpenShift client tool RHC.
Setup
Before using RHC, you have to run a wizard to configure certain items.
Setup wizard saves the configuration in $HOME/.openshift.
generates an authorization token for the client, which enables the client to have password-less interactions with server. Token last for a day and after that, rhc asks for the credentials to generate a new token.
uploads the public key to the server.
creates namespace and setup domain for the account.
Namespace is unique to an account and forms a part of an application
URL. It may contain a maximum 16 alphanumeric characters and may not
have spaces or symbols. In this chapter, we are going to use
finsdemo as our namespace. If we name our app as testapp then
the URL of the application would be
http://testapp-finsdemo.rhcloud.com. Needless to say, you will not
be able to use finsdemo as namespace for your account as this
namespace is already tagged to our account.
$ rhc setup
In the setup wizard, enter your account id (Email id used to create the account) and password to continue. Screen-shot of a typical interaction is as follows.
Generate a token now? (yes|no) yes
Generating an authorization token for this client ... lasts about 1 day

Saving configuration to /home/m/.openshift/express.conf ... done

Your public SSH key must be uploaded to the OpenShift server to access code.  Upload
now? (yes|no)
yes

Since you do not have any keys associated with your OpenShift account, your new key will
be uploaded as the 'default' key.

Uploading key 'default' ... done

Checking for git ... found git version 1.7.10.1

Checking common problems .. done

Checking your namespace ... none

Your namespace is unique to your account and is the suffix of the public URLs we assign
to your applications. You may configure your namespace here or leave it blank and use
'rhc create-domain' to create a namespace later.  You will not be able to create
applications without first creating a namespace.

Please enter a namespace (letters and numbers only) |<none>|: finsdemo
Your domain name 'finsdemo' has been successfully created
In case, your chosen namespace is unavailable, then you have to select another one. At this stage, you may skip the namespace by entering none and create it later (but, it has to be before you create your first application) with
$ rhc domain create <namespace>
There is no harm in running the setup again, and during subsequent
setups, wizard reuses the configuration saved in $HOME/.openshift. In
case, this directory is messed-up, then delete the directory and run
setup again to recreate fresh configuration.
Important
In this chapter, we use demo as app name and finsdemo as namespace in all examples. Replace them with your own app name and namespace when you are trying out OpenShift.
Create application
An OpenShift application is your application code, plus one or more Cartridges. OpenShift comes with many built-in cartridges like languages (Java, Ruby etc.), environment (JBoss, Tomcat etc.,) and services (MySQL, MangoDB etc.,). Cartridges are deployed to one or more secure containers for your code known as gears.
Gear is a resource-constrained container or virtual host that runs one or more user-specified software stacks (cartridges) and application code. Small gear comes with 512MB of RAM and 1GB storage while Medium gear has 1GB RAM and 1GB storage. Free plan comes with 3 small gears.
To begin with, let’s create an application named demo in our namespace finsdemo with a Tomcat 6 cartridge. We are free to name the application with any name.
$ cd <some workdir>  // !!! rhc creates folder in work dir
$ rhc app create demo jbossews-1.0
JBoss EWS is a web server built on Apache and Tomcat. JBoss EWS version 1.0 uses Tomcat 6. RHC creates an application named demo and completes the following.
registers a domain name demo-finsdemo.rhcloud.com with DNS.
a copy of the application code is checked out (cloned) to your work directory to a folder named demo.
runs the components of the application (application code plus cartridge) on virtual server, referred to as Gear.
Your application code is now in 'demo'

demo @ `http://demo-finsdemo.rhcloud.com/` (uuid: 51fa####################)
-------------------------------------------------------------------------
  Created: 7:41 PM
  Gears:   1 (defaults to small)
  Git URL: ssh://51fa###########@demo-finsdemo.rhcloud.com/~/git/demo.git/
  SSH:     51fa###########@demo-finsdemo.rhcloud.com

  jbossews-1.0 (Tomcat 6 (JBoss EWS 1.0))
  ---------------------------------------
    Gears: 1 small

RESULT:
Application demo was created.
App is accessible at http://demo-finsdemo.rhcloud.com, which displays
OpenShift Welcome page. Create action clones the application source to a
folder named demo in your work directory, which we require later to
deploy Fins.
Application may be deleted with following command, which permanently deletes the application from OpenShift server and frees the allocated gear.
$ rhc app delete demo
RHC help
See - rhc help for available commands and rhc help <command> for more information on a specific command.
One of the frequently used command is app and rhc help app lists
actions.
List of Actions
  create        Create an application
  delete        Delete an application from the server
  start         Start the application
  stop          Stop the application
  .....
rhc help app create shows more info about create action.
Cartridges
OpenShift cartridges are pluggable components that can be added to an application to extend its functionality.
OpenShift comes with several built-in cartridges based on the popular languages, servers, frameworks and databases. To list the available cartridges use
$ rhc cartridges
Out of the listed cartridges, we need MySQL cartridge - mysql-5.1 and database admin cartridge - phpmyadmin-3.4. Add these cartridges to demo application with
$ rhc cartridge add mysql-5.1 -a demo
$ rhc cartridge add phpmyadmin-3.4 -a demo
Output shows Connection URL, Root User, Password for MySQL and URL for phpmyadmin. There is no need to note down the details as they are retrievable through rhc at any time. View app details with
$ rhc app show demo
demo @ `http://demo-finsdemo.rhcloud.com/` (uuid: 51fa####################)
-------------------------------------------------------------------------
  Created: Aug 01  7:41 PM
  Gears:   1 (defaults to small)
  Git URL: ssh://51fa####################@demo-finsdemo.rhcloud.com/~/git/demo.git/
  SSH:     51fa####################@demo-finsdemo.rhcloud.com

  jbossews-1.0 (Tomcat 6 (JBoss EWS 1.0))
  ---------------------------------------
    Gears: Located with mysql-5.1, phpmyadmin-3.4

  mysql-5.1 (MySQL Database 5.1)
  ------------------------------
    Gears:          Located with jbossews-1.0, phpmyadmin-3.4
    Connection URL: mysql://$OPENSHIFT_MYSQL_DB_HOST:$OPENSHIFT_MYSQL_DB_PORT/
    Database Name:  demo
    Password:       U5##########
    Username:       admin#######

  phpmyadmin-3.4 (phpMyAdmin 3.4)
  -------------------------------
    Gears:          Located with jbossews-1.0, mysql-5.1
    Connection URL: https://demo-finsdemo.rhcloud.com/phpmyadmin/
It shows the details of cartridges, Connection URL, User and Password for database. MySQL and PhpMyAdmin cartridges shares the existing application Gear without consuming additional gears.
Shell
OpenShift provides access to the virtual host (gear) on which your application is running.
Warning
Here is the waring snippet from the welcome message. !!!
Shell access is quite powerful and it is possible for you to accidentally damage your application. Proceed with care! If worse comes to worst, delete your application with rhc app delete and recreate it.
SSH to the application shell with
$ rhc app ssh demo
Free plan Gears comes with 1GB of gear storage, and it is used for code, logs, cache, config files, and databases. From the shell you may check the usage.
> quota -s
Disk quotas for user 51fa#################### (uid 3###):
     Filesystem  blocks   quota   limit   grace   files   quota   limit   grace
/dev/mapper/EBSStore01-user_home01
                  30640       0   1024M             416       0   40000
Application Code
When we create the application, RHC clones the application to a folder with application name. Contents of this folder are
$ tree demo

demo
├── pom.xml
├── README.md
├── src
│   └── main
│       ├── java
│       ├── resources
│       └── webapp
│           ├── images
│           │   └── jbosscorp_logo.png
│           ├── snoop.jsp
│           └── WEB-INF
│               └── web.xml
└── webapps

8 directories, 6 files
We are not interested in its content, but we require this folder to
deploy the application back to OpenShift. There is no harm if the folder
is deleted on local system, as we can always clone it from the
OpenShift. Command - rhc app show <app name> displays the Git
repository address.
$ rhc app show demo
demo @ `http://demo-finsdemo.rhcloud.com/` (uuid: 51fa####################)
-------------------------------------------------------------------------
  Created: Aug 01  7:41 PM
  Gears:   1 (defaults to small)
  Git URL: ssh://51fa####################@demo-finsdemo.rhcloud.com/~/git/demo.git/
   .....
Clones the application from repository into a folder demo with
$ git clone ssh://51fa####################@demo-finsdemo.rhcloud.com/~/git/demo.git/
Web console
Many of the tasks performed so far with RHC may also be done through web console.
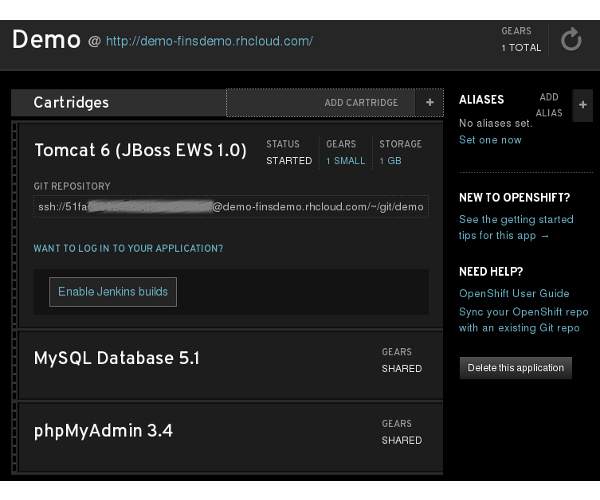
Figure 12.2. Manage app in Web Console
OpenShift application demo is ready with required cartridges and only thing left out is the code. The next section prepares the project and code for deployment.