WordPress with XAMPP
While Docker is the easiest way to install and run Wordpress, another option is XAMPP. Xampp by Apache Friends bundles Apache, MySQL, PHP and Pearl as an installer. Xampp comes as separate package for Linux, Windows and Mac. Download the appropriate package for your system from Xampp Download page. We explain how to install it on Linux and Windows.
For Docker method, see Install Wordpress on Docker; it is much easier than Xampp.
Install Xampp on Linux.
Download Xampp version 5.5.19 as it contains PHP 5.5 and MySQL 5.6 instead of the latest 5.6.3 with PHP 5.6. We need root access to run the Xampp installer.
Change mode of the downloaded file and run Xampp installer.
# chmod 755 xampp-linux-5.5.19-0-installer.run

# ./xampp-linux-5.5.19-0-installer.run
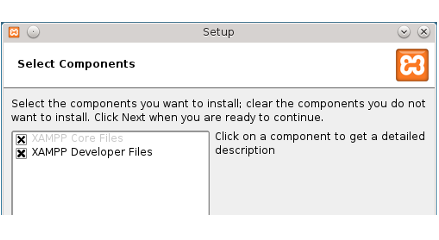
In the Setup screen, select both core and dev components.
Xampp installer unpack all components under /opt/lampp directory.
After installation, use following commands to start and stop the servers.
[root@m m]# /opt/lampp/lampp start

Starting Xampp for Linux 5.5.19...
Xampp: Starting Apache...ok.
Xampp: Starting MySQL...ok.
Xampp: Starting ProFTPD...ok.
To stop servers, use /opt/lampp/lampp stop
libc.so error.
In Fedora 19, when we start the Xampp we got lib.c not found error.
error while loading shared libraries: libc.so.6: cannot open shared object file: No such file or directory.
To resolve this, we need to edit /opt/lampp/lampp file and change line
436 and pass proper kernel version of our system.
export LD_ASSUME_KERNEL=3.9.5
Install Xampp on Windows.
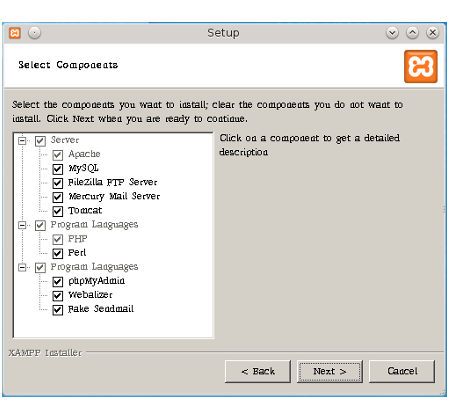
Download Xampp Windows version 7.4.16 which bundles PHP 7.4 and MariaDB 10.4. Run downloaded installer and in the Setup screen select all components.
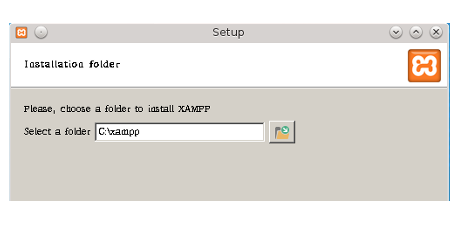
In Windows, by default Xampp installs under C:\xampp directory. Go with the default path to avoid further setup.
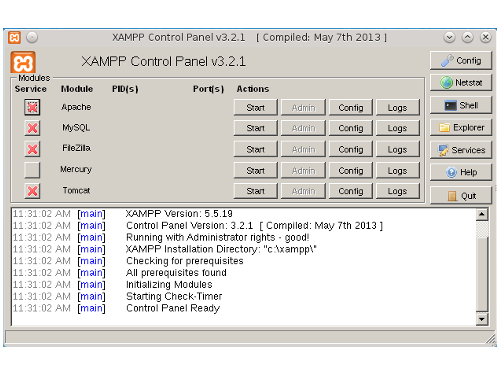
Run C:\xampp\xampp-control to bring up the Xampp Control Panel. Start
and stop the servers through the control panel.
Test Xampp Setup.
From here on steps are same for Linux and Windows. Before installing
WordPress on Xampp we need to test the setup. To do that, start MySQL
and Apache servers and then open http://localhost in the browser and
click Status in the left menu.
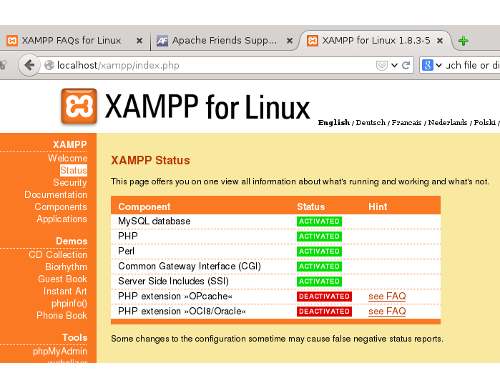
To run WordPress, we need components MySQL and PHP as activated.
Install WordPress.
We are ready to install WordPress.
Xampp Document Root
In Xampp, Document Root, the directory that holds web site is
directory named htdocs.
In Linux, it defaults to /opts/lampp/htdocs and in Windows it is
c:xampp\htdocs.
For sake of brevity, we explain the installation process on Linux. For
Windows, we have to adjust the paths slightly. The Linux path
/opt/lampp is c:\xampp in Windows and likewise /opt/lampp/htdocs is
c:\xampp\htdocs. Apart from this, development steps are same under Linux
and Windows.
Normally WordPress is installed directly under Document Root directory. But document root, htdocs, already contains some Xampp example files. Rather than deleting those files, we can install WordPress under a subdirectory. This also allows us to install multiple versions of WordPress and switch version to test the plugin against different versions. With this strategy, we can even configure WordPress to run as Multi Site and switch between single or multi site.
First rename the index.php that comes with Xampp as xampp.php with a move or rename command.
$ mv index.php xampp.php
Next, download the latest WordPress.zip from WordPress and install it in /opt/lampp/htdocs
$ cd /opt/lampp/htdocs
$ unzip wordpress-4.0.1.zip
$ mv wordpress wordpress-4.0.1     // rename the dir
We rename the wordpress directory as wordpress-4.0.1 so that we are
free to install other versions later.
Apache should redirect all access to http://localhost/ to files in
WordPress directory and for that add following files to
/opt/lampp/htdocs.
/opt/lampp/htdocs/index.php
<?php
/**
 * Front to the WordPress application. This file doesn't do anything, but loads
 * wp-blog-header.php which does and tells WordPress to load the theme.
 *
 * @package WordPress
 */

/**
 * Tells WordPress to load the WordPress theme and output it.
 *
 * @var bool
 */
define('WP_USE_THEMES', true);

/** Loads the WordPress Environment and Template */
require( dirname( __FILE__ ) . '/wordpress-4.0.1/wp-blog-header.php' );
/opt/lampp/htdocs/.htaccess
# BEGIN WordPress
<IfModule mod_rewrite.c>

RewriteEngine On
RewriteBase /
RewriteRule ^index.php$ - <a href="https://api.wordpress.org/secret-key/1.1/salt/" target="_blank">L]

# add a trailing slash to /wp-admin
RewriteRule ^([_0-9a-zA-Z-]+/)?wp-admin$ $1wp-admin/ [R=301,L]

RewriteCond %{REQUEST_FILENAME} -f [OR]
RewriteCond %{REQUEST_FILENAME} -d
RewriteRule ^ - [L]
RewriteRule ^([_0-9a-zA-Z-]+/)?(wp-(content|admin|includes).*) wordpress-4.0.1/$2 [L]
RewriteRule ^([_0-9a-zA-Z-]+/)?(.*.php)$ wordpress-4.0.1/$2 [L]
RewriteRule . index.php [L]

</IfModule>

# END WordPress
To switch to the another version, we have to replace the wordpress-4.0.1 strings in these files to the new directory.
Next add WordPress Configuration file wp-config.php to
/opt/lampp/htdocs/wordpress-4.0.1 by copying and editing the sample
config file that comes with WordPress.
$ cd /opt/lampp/htdocs/wordpress-4.0.1
$ cp wp-config-sample.php wp-config.php
Edit MySQL config section as follows.
/opt/lampp/htdocs/wordpress-4.0.1/wp-config.php
/** The name of the database for WordPress */
define('DB_NAME', 'wordpress');

/** MySQL database username */
define('DB_USER', 'wp');

/** MySQL database password */
define('DB_PASSWORD', 'wp');

/** MySQL hostname */
define('DB_HOST', 'localhost');
In the WP Config file, we also need to enter some unique phrases for the items in Authentication Keys and Salts section. From wp-config.php, remove the lines shown in the next screenshot.
/opt/lampp/htdocs/wordpress-4.0.1/wp-config.php
define('AUTH_KEY',         'put your unique phrase here');
define('SECURE_AUTH_KEY',  'put your unique phrase here');
define('LOGGED_IN_KEY',    'put your unique phrase here');
define('NONCE_KEY',        'put your unique phrase here');
define('AUTH_SALT',        'put your unique phrase here');
define('SECURE_AUTH_SALT', 'put your unique phrase here');
define('LOGGED_IN_SALT',   'put your unique phrase here');
define('NONCE_SALT',       'put your unique phrase here');
We can get random unique keys and salts from WordPress Org. Open WordPress API in a browser tab, which generates and displays random keys and salts. Copy the contents, paste it to the WP Config file’s and save the changes.
Final step is to create new database in MySQL to hold WordPress tables. Login to MySQL create a database named wordpress and grant privileges on the database to user named wp with password wp as shown below.
$ cd /opt/lampp
$ bin/mysql -u root
mysql> create database wordpress;
mysql> GRANT ALL PRIVILEGES ON wordpress.* TO wp@localhost IDENTIFIED BY 'wp';
mysql> flush privileges;
mysql> exit
With everything in place, open http://localhost in the browser to get
WordPress installation screen. Complete the WordPress installation.
Multiple WordPress Versions
As we installed WordPress under a separate directory in htdoc, we can keep multiple versions of WordPress and switch between them. To install new version, follow these steps.
Extract required version of wordpress zip in htdocs and rename the wordpress directory with a version number such as wordpress-x.x.x where x.x.x is the version number.
Edit
/opt/lampp/htdocs/index.phpand/opt/lampp/htdocs/.htaccessand change existing WordPress paths to new path.Copy the wp-config.php from a existing setup and change the line
define('DB_NAME', 'wordpress-x.x.x')with a new database name. This is essential else WordPress uses an existing database of an earlier version.In MySQL, create new a database and grant privileges as done earlier.
In browser, access the site and complete WordPress installation.
To switch back to an earlier version, edit
/opt/lampp/htdocs/index.phpand/opt/lampp/htdocs/.htaccessand change WordPress paths.
In the next section, we start with WordPress plugin basics.