11.2. WordPress Dropbox Backup
In the previous section, we backup the WordPress installation. In this section, we setup Dropbox to receive files from OpenShift and then automate the WordPress Dropbox Backup process.
OpenShift to Dropbox
It makes sense to move the backup files out of OpenShift to Dropbox as it serves two purposes - conserves storage space and in the unlikely event of application corruption, we have a safe set in Dropbox.
The steps to connect WordPress to Dropbox are:
Create Dropbox App: Dropbox does not accept files sent directly, and it only accept files handed over by a Dropbox App.
Allow access to App: Allow access to the Dropbox App to receive files from other systems. When access is allowed, App provides authentication tokens and secrets.
Send files to App: Using the authentication tokens, OpenShift can send files to Dropbox App, which in turn puts the files in Dropbox.
Let’s start with Dropbox App creation. Don’t worry, it’s quiet easy! Log in to the Dropbox account and open the Dropbox App Console. In App console, click Create app. Select following options:
What type of app do you want to create - Dropbox API App.
What type of data does your app need to store on Dropbox - Files and Datastore.
Can your app be limited to its own folder - Yes
In App Name field, enter a name for the app and click Create app. Dropbox creates the app and displays the app details, where we need to note down App Key and App Secret. We require these values to authenticate from OpenShift in the next step. We can always get these values from Dropbox App Console.
We need to run setup to link OpenShift to Dropbox. To setup, log in to the OpenShift Shell through RHC or PuTTY (Windows users).
In OpenShift Shell, change directory to app-root/data/backup.
> cd app-root/data/backup
Run dropbox-setup.sh script.
> ./dropbox-setup.sh
Setup prompts for App Key and App Secret and on authentication, it displays a Dropbox URL. Open the URL in the browser, which shows Dropbox App Authorization screen. Click Allow access to complete the authorization from Dropbox end.
Switch back to OpenShift Shell and press Enter to complete the setup.
Script saves the authorization tokens received from the Dropbox in a
file named .dropbox_auths. It is hidden file in backup directory and we
can use cat .dropbox_auths to display its contents. Setup is one time
affair and it allows us to send files to Dropbox without use of
passwords.
With the setup, OpenShift is ready to push files to Dropbox. For the WordPress Dropbox backup, use the backup-to-dropbox.sh script.
> ./backup-to-dropbox.sh
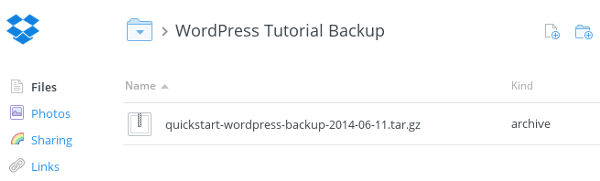
Dropbox script is extended version of the previous script. It creates
the backup gzip file and pushes it to our Dropbox account. Dropbox App
creates a folder - Apps/<dropbox-app-name> and save the file under it.
After uploading, script deletes the backup set from OpenShift to
conserve storage. In the screenshot, backup gzip file is in folder named
WordPress Tutorial Backup (Dropbox app name) under the Apps folder.
Automate WordPress Dropbox Backup
To automate WordPress Dropbox Backup, we have to add Cron cartridge to OpenShift and then add the backup script to the Cron folder.
We can use RHC or OpenShift Web Console to add a new cartridge to our application. First, we need to know the full name of the Cron cartridge. To list the available cartridges run:
C:> rhc cartridges
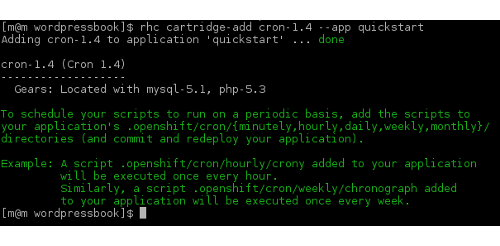
From the list, we know name of the cartridge is cron-1.4. To add the cartridge to the OpenShift application run:
C:> rhc cartridge-add cron-1.4 --app quickstart
For monthly backup, we have to copy backup-to-dropbox.sh script to
.openshift/cron/monthly directory, which is in application deployment
directory usually app-root/repo. However, a direct copy to the
repository has a drawback.
OpenShift use Git software configuration management tool for application deployment. Git keeps track of the deployments and allows us revert to any previous versions. However, Git does not track the files copied directly to the repository. To properly place the script file in Cron folder, we have to go through following procedure.
In the command prompt, run following RHC command to find out the Git repository URL.
C:> rhc apps
From the output, copy the Git URL to clipboard. Next, we need to use Git to download the application. We can also find out Git URL in OpenShift Web Console → Applications → Application Overview → Source Code field.
C:> git clone ssh://xxeca20e8@quickstart-wordpressguide.rhcloud.com/~/git/quickstart.git/
Change the example URL to the real Git URL of the application. Git
clones (downloads) the WordPress application source code and save it to
a directory with the same name as the application. For application
quickstart, it clones the source to directory named quickstart. We
call this directory as cloned source directory.
Next we need to copy backup-to-dropbox.sh to .openshift/cron/monthly
in cloned directory. We need to download wordpress-tutorial-sample.zip
from CodeTab Downloads and
extract backup-to-dropbox.sh from it. and copy it to
.openshift/cron/monthly directory in cloned source directory.
Change to cloned source directory and run following commands. Replace <path-to> in copy command to the actual path of backup-to-dropbox.sh script file.
 Windows

C:> copy <path-to>backup-to-dropbox.sh .openshiftcronmonthly


 Linux

$ cp <path-to>/backup-to-dropbox.sh .openshift/cron/monthly
Next from the source directory, run
C:> git status
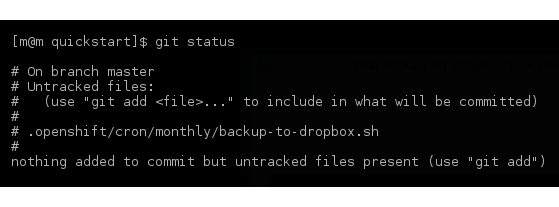
Git output indicates that it is yet to track the new file. Use Git add action to add a file.
 Windows

C:> git add .openshift/cron/monthly/backup-to-dropbox.sh
C:> git update-index --chmod=+x .openshift/cron/monthly/backup-to-dropbox.sh

 Linux

$ chmod 755 .openshift/cron/monthly/backup-to-dropbox.sh
$ git add .openshift/cron/monthly/backup-to-dropbox.sh
Again check the git status, and it should show the file as added.
Next, commit the changes.
Windows

C:> git commit -m "Cron job - backup to dropbox added"

Linux

$ git commit -m "Cron job - backup to dropbox added"
So far, the changes are applied to local repository that exists in our PC. We need to send these changes to the Git Repository in OpenShift. To do that,
Windows

C:> git push

Linux

$ git push
Git pushes all the changes back to the repository in the server. As part of deployment, Git also restarts our application and cartridges so that changes becomes effective.
From hereon, Cron takes over and runs the backup script every month. For CodeTab, we have set monthly backup as changes are less frequent. Additionally, we run manual backup in the OpenShift shell whenever we create new pages.
In the next section, we do a full WordPress restore from the backup set.