In this appendix OpenShift DNS Setup, we describe the steps to setup a Domain name or DNS name for an OpenShift WordPress application.
WordPress site that is behind a custom domain name is easy to migrate to another hosting platform without affecting the search ranking and traffic.
Take the case of codetab.org and its real URL tuts-codedrops.rhcloud.com. To popularize the site we publish its link in various popular forums like Redit, DZone, Serverside, etc. If we publish its real URL, then we are stuck with that forever. Search engines start indexing the site and soon the URL is archived by several sites. After that, moving the site to a new link is a difficult task though possible. To overcome these limitations, we use the domain name codetab.org for the site. With the use of domain name, we are free to migrate the application to another name in OpenShift or to other hosting platforms, without worrying about the search results and traffic.
Get a Domain Name
To use a custom domain, we have to purchase a domain name from a domain registrar like GoDaddy, Domains.com, Name.com. For codetab.org, we purchase the domain from GoDaddy. However, any leading registrar is fine. Usually, domain names are offered for 1 to 5 years and also for 10 years. For codetab.org, for the first year we paid US$ 4 (after discount) and second year onwards it is about US$ 10 per year. Rate depends on the name we choose.
Before the purchase, spend some time to think about catchy and trendy names. To check their availability, go to the domain registrar’s site and search. When the desired name is available, we need to make online payment and block the name. On the payment, they block the DNS name and redirect us to create an account by furnishing the essential details such as owner name, address, e-mail id, password, etc.
To explain the OpenShift DNS Setup steps, we take GoDaddy as an example, but procedure is more or less similar with other leading domain name providers. Example setup uses codetab.org as the DNS name and tuts-codedrops.rhcloud.com as the OpenShift application. Obviously, you have to replace them with your domain names.
Note
OpenShift DNS Setup is more or less same for all domain providers, but menu options and setup screens may differ. Overall, we have to setup two items - Add CNAME Record and Forwarding. Go through this appendix and understand the OpenShift DNS Setup procedure and then refer the domain provider’s documentation to setup CNAME and Forwarding in their portal.
Setup DNS CNAME
When we host WordPress on a dedicated server with a static IP then we can point the domain name directly to the IP. However, when WordPress is on a shared or cloud platforms, we get a public URL instead of a static IP and in such cases, we can not directly point the domain name to the public URL. In other words, we cannot point codetab.org (domain name) to tuts-codedrops.rhcloud.com (OpenShift application URL).
Way out is to add a DNS CNAME Record. CNAME is the short form for canonical name (real name) is a DNS record that maps an alias name to a real name. CNAME records are typically used to map a subdomain such as www or mail to the domain hosting.
Let’s add a CNAME record to understand the concept. Go to the DNS account and select the Domains to list out the domains allotted to the account. Click on a domain to make changes to its zone file.

It opens the Domain Details screen for the selected domain. In GoDaddy, Domain Details screen has three tabs - Settings, DNS Zone File and Contacts. Select DNS Zone File tab.
DNS Zone file tab displays various records already there in the DNS Zone file of the domain. Click on Add Record to open Add Zone Record dialog and choose CNAME as Record type in the dialog.
In Edit Zone Record dialog enter the fields and save the record.
Host - www
Points to - tuts-codedrops.rhcloud.com
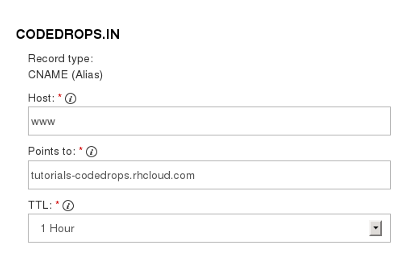
The record says that a host www (alias) in codetab.org domain points to tuts-codedrops.rhcloud.com (real name). In other words, www.codetab.org points to tuts-codedrops.rhcloud.com.
After the save, DNS propagates the changes to all root name servers. Domain dashboard displays a message that it may take 24 or 48 hours to changes to take effect. Normally, we see changes in minutes.
OpenShift Alias
Next, we have to set alias to our OpenShift application. Aliases allow us to use custom domain names for the applications on OpenShift. Log in to OpenShift Web Console and select Applications tab. Select the WordPress application and click Change link in the top bar (next to the public URL of the application). OpenShift displays the New Alias screen.
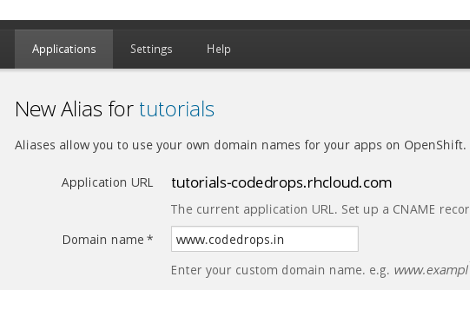
Enter domain name as www.codetab.org, the CNAME we set in DNS Zone file and save the new alias.
After the DNS changes take effect, we should be able to see the WordPress site when we open www.codetab.org in the browser.
Domain Name Forwarding
When we access the plain domain name - codetab.org, we get a page from the domain provider site. Visitors, who use the plain URL, leave the site thinking that it is under construction. To overcome this, use Domain Forwarding.
The plain domain name without a suffix or subdomain name is called Naked Domain. Some domain providers allow to point naked domain to another URL. With that feature, we can add a Host Record (formally known as A record) and point codetab.org to tuts-codedrops.rhcloud.com. However, many domain providers do not allow to map the naked domain to another URL. With such domain providers, we can add a Host Record and point it to a static IP but not to another URL. In other words, they do not allow to point the naked domain codetab.org to tuts-codedrops.rhcloud.com. It is not helpful to us as OpenShift application like any other hosting solutions does not come with a static IP. Fortunately, domain providers allow to forward the naked domain to another URL.
To setup Forwarding, open Domain settings page and click on Manage link in Forwarding - Domain section to open the Edit Forwarding screen.
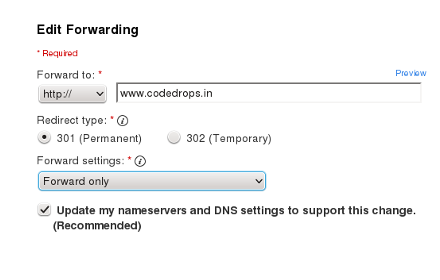
Fill the fields as:
Forward to: www.codetab.org
Redirect Type: 301 (Permanent)
Forward Settings : Forward Only
Update my name server … : Select
Be careful about the Forward to field, where we need to enter the CNAME we set earlier.
After DNS changes take effect, the naked domain name - codetab.org resolves to the OpenShift WordPress site.