In this Appendix, we install OpenShift RHC Client Tools, setup RHC and place WordPress Tutorial scripts and sample pages in OpenShift server. OpenShift RHC Client Tools is useful to manage OpenShift applications and to access OpenShift Shell. We have to access OpenShift Shell for a couple of tasks: to backup the site and to place the sample HTML in the server.
OpenShift RHC Client Tools
OpenShift Client tools also called as RHC is a command line tool used to create and manage the OpenShift applications. We require RHC to log in to OpenShift Shell using SSH. RHC is built in Ruby.
Windows
To install OpenShift RHC Client Tools on Windows, we have to install three items - RubyInstaller, Git and OpenShift RHC.
Install RubyInstaller
RubyInstaller is a self-contained Windows-based installer that includes the Ruby language and execution environment. Download the stable release from RubyInstaller Org and install. During the installation accept all of the defaults, but it is mandatory to select the Add Ruby executables to your PATH check box in order to run Ruby from the command line.
After the installation, verify the installation. Open command prompt using Start → Run and enter cmd and click OK. In the command prompt, execute the following command.
C:> ruby -e 'puts "Welcome to Ruby"'
Welcome to Ruby
Install Git
Git is a software configuration management (SCM) that keeps track of changes to software source code. With Git, we can manage the OpenShift application source repository. Download latest release from Git Hub and install with all defaults. Open command prompt and verify Git installation.
C:> git --version
git version 1.9.2
Install RHC
To install OpenShift RHC Client Tools, open command prompt and run the following command.
C:> gem install rhc
Next we have to setup RHC and to do that, proceed to Setup RHC
Linux
Here we explain the installation of RHC on Fedora. For other distributions, install Ruby (full), Ruby Gems, GIT and RHC as explained for Windows.
Install RHC
On Fedora Linux, we have to install rubygem-rhc, which installs Ruby, GIT and other dependencies required to run OpenShift RHC client tools.
$ sudo yum install rubygem-rhc
It installs Ruby, Git, and the other dependencies. Next we have to setup RHC.
Setup OpenShift RHC
We have to configure OpenShift RHC to work with the OpenShift account. RHC setup goes through following steps:
Prompts for the OpenShift account User ID and password. For User ID, we have to enter the e-mail ID we used to create the OpenShift account.
RHC creates and stores a token on disk, which allows us to carry out application management and access the OpenShift Shell without using a password. Authentication tokens last for a month and after the expiry of tokens, we are forced to re-authenticate again with the e-mail id and password to generate fresh tokens.
Checks whether there are any SSH Public-Private key pairs in the
.sshfolder. If a key pair exists, then rhc uploads the public key to the OpenShift server else rhc creates a new pair and uploads the newly created public key. SSH keys are used encrypt the traffic between PC and OpenShift server.
To setup RHC, execute the following command from the command prompt. Even though we show commands for Windows, Linux users have to run the same setup commands.
C:> rhc setup
RHC interactive setup wizard displays and prompts us to complete the rest of the process. When prompted for OpenShift User ID and password, we have to enter the e-mail ID and password used to create the OpenShift account.
Note
It is safe to run rhc setup any number of times. During reruns, setup reads existing configuration and completes the setup. To do a fresh setup; delete openshift (or .openshift) directory from the user’s home directory and run rhc setup again.
Test the RHC setup by running following command, which connects to OpenShift server and displays the apps configured in our account.
C:> rhc apps
Install PuTTY SSH Client for Windows
Windows users require an additional tool - PuTTY. To access to OpenShift Shell and also to copy files over SSH, windows user have to install PuTTY.
OpenShift Shell
OpenShift provides access to the terminal of the virtual host (gear) on which our application is running. OpenShift terminal is also known as OpenShift Shell.
Linux users can log in to OpenShift Shell using the following command from the command prompt. Replace <your app name> with the name of the OpenShift WordPress application.
$ rhc ssh <app name>
Windows user have two options to login to shell. They can either use RHC or PuTTY. To use rhc, we need to know the path to SSH executable file in our PC and use RHC as follows. Replace <path_to_ssh_executable> with the actual path to SSH executable file.
C:> rhc ssh --ssh <path_to_ssh_executable> <app name>
Use Putty to login and OpenShift Shell displays welcome message and the prompt as shown in the screenshot.
Warning
Shell access is quite powerful, so be extra careful while we are in the shell. If something goes wrong, then only option is to delete and create a new application.
!OpenShift RHC Client Tools - OpenShift Shell.](../media/rhc-console.png)
OpenShift IDs.
At this point, let’s clarify the various frequently encountered items when we work with OpenShift. It is important understand their meaning and usage.
OpenShift Account: we use an e-mail ID to create an OpenShift account, and we use it to login to OpenShift server.
We use the e-mail id to log in to OpenShift Web Console.
RHC uses our e-mail id and tokens (created during RHC setup) when we log in to OpenShift Shell.
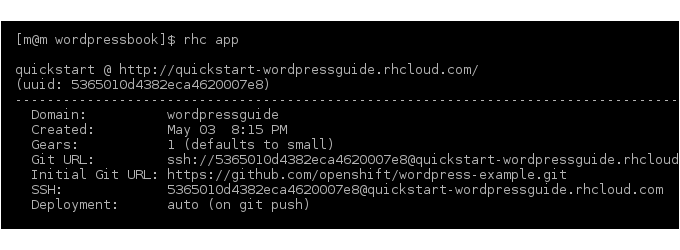
Application Public URL: when we create an application, OpenShift allots a public URL to like
http://quickstart-wordpressguide.rhcloud.com, and we use this to access the application.Application User ID: For each application, OpenShift creates a virtual Linux server, and we need a User ID to access this virtual server. UUID, a 24 chars hex decimal string, is a unique ID allotted to our virtual server, which is also the User ID. When we see a long hex string, we know that its is our unique user id in OpenShift cloud.
a word about Prompts
In the tutorial, we run commands from a Windows Prompt or Linux Console or OpenShift Shell. We use following prompts to distinguish between the three systems.

Download Tutorial Code to OpenShift
To complete the tasks in some of the chapters, we need scripts and
sample pages from the wordpress tutorial sample zip, which is
available at GitHub.
We can directly download the file to OpenShift server and for that, log
in to OpenShift Shell using RHC (Linux users) or PuTTY (Windows users).
In the OpenShift Shell, change the directory to app-root/data.
> cd app-root/data
In OpenShift, we can use the Wget to download the
wordpress-tutorial-sample.zip from CodeTab.
> wget ../media/wordpress-tutorial-sample.zip
Curl downloads the wordpress-tutorial-sample.zip from CodeTab and save it. Next, use unzip command to extract the wordpress-tutorials.zip.
> unzip wordpress-tutorial-sample.zip
The zip file contains two folders:
htmlimport folder contains sample HTML files with distinct stylesheets and images, which we use to describe WordPress static page import.
backup folder contains WordPress Backup and Dropbox setup scripts.