W3 Total Cache - Page Cache
In the previous chapter, we installed essential plugins to extend the functionality of the WordPress. In this chapters, we optimize the site to boost the performance.
Out of the box, WordPress performance is suboptimal. Performance penalty stems from the dynamic nature of the pages and the scripting language used to develop the WordPress. Unlike regular programming languages, scripting languages like PHP interpret the code on the fly. On a page request, PHP module interprets a number of WordPress core, theme and plugin files and also fetches contents from the database to compose the response. Wordpress repeats the entire sequence for each and every request, which not only impacts the response time, but also puts avoidable load on the server and database.
To overcome this inherent performance issue, we need to use the caching solution. Caching, as the name suggests, caches the fully constructed page, and serves the future requests directly from the cache to avoid resource intensive interpret and composing. In other words, as long as page is not modified, all requests are handled at cache layer, and server recompiles the page only when page is modified.
WordPress W3 Total Cache and W3 Super Cache are recommended caching plugins. We use W3 Total Cache for codetab.org, which greatly improves the performance of the site.
W3 Total Cache Settings for OpenShift
W3 Total Cache settings are quite extensive and may overwhelm the beginners. Out these settings, we use the most recommended settings and leave some of the complicated or paid features. Some of the features require additional server components, which is difficult to setup on OpenShift platform. In this tutorial, we present the W3 Total Cache Settings dovetailed for OpenShift that boosts the performance to a decent and acceptable level. As usual, we avoid lengthy discussion on the settings, yet put down sufficient details so that beginners can easily follow the setup. W3 Total Cache Settings screens are quite lengthy and difficult to capture as regular screenshots, so we exhibit the settings as bullet points.
Install and activate W3 Total Cache Plugin. Plugin installation is explained in WordPress Plugin.
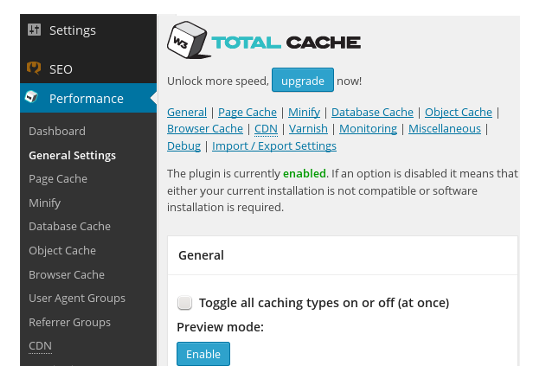
General Settings
Plugin adds a menu item - Performance - to the WordPress Admin Dashboard. Click to expand the menu and select General Settings.
In, General Settings we can enable or disable the various caching modules of W3 Total. Modules are also called as Cache Types and they are:
Page Cache - caching the pages reduce the response time of the site.
Minify - reduces load time by decreasing the size and number of CSS and JavaScript files and also removes extra characters from CSS, JavaScript and HTML files.
Database Cache - reduces post, page creation time.
Object Cache - reduces execution time for common operations.
Browser Cache - reduces response time by using the visitor’s web browser cache.
CDN - uses Content Delivery Network to reduce the page load time.
Reverse Proxy - uses caching HTTP reverse proxy or varnish cache as web application accelerator.
In General Settings screen, we can either scroll through or use the links at the top to visit a specific cache type. General Settings screen also a field to toggle the state of all caching type. Out of these caching types or modules, we use Page Cache, Minify and Browser Cache.
W3 Total Cache - Page Cache
Page Cache, as the name suggests, cache the posts and pages to avoid repeated parsing and database access.
To enable Page Cache, go to the Page Cache section with Dashboard → Performance → General Settings → Page Cache. Enable Page cache and set Page Cache Method to Disk: Enhanced and save settings.
Next, we need to configure the Page Cache module settings. Open Page Cache Settings screen with Dashboard → Performance → Page Cache. We leave majority of settings here to their defaults and change only following items.
Cache SSL (https) requests - enable
Don’t cache pages for following user roles - enable.
select Administrator.
Cache Preload
On the first request of a page, server constructs the page and hand over the finished page to W3, which caches it for the future requests. Obviously, response is slow for the first request. W3 has a feature to automatically prime the cache by preloading the pages. To enable Cache Preload, set the following items.
Automatically prime the page cache: enable.
Update interval: 900 seconds.
Pages per interval: 5 or lesser.
In OpenShift, we observed a slight increase in the server load after
enabling this feature. So we have disabled it. Instead, we manually
prime the cache by accessing all the pages, whenever we purge the cache.
If you are using Linux, then you may consider this option. Prepare a
list of URL of all your pages and posts and run wget -i urllist.txt.
Easy way to get the URL list is to download the sitemap.xml of the site
and grep for loc (location) elements. We cover Sitemap in SEO chapter.
In the next section, we look at Browser Cache module of W3 Total Cache to further improve the user experience.