In the previous chapter, we saw how to add and manage contents - Posts, Pages and Media - in the WordPress. In this chapter, we install a new WordPress Theme and customize.
WordPress theme customizes the look and feel of the site. WordPress, being one of the leading CMS, attracts hundreds of designers and developers who contribute themes and plugins to WordPress ecosystem. There is no dearth themes to meet one’s need and on last count, there are about 2500 themes. We can browse and download themes from WordPress Themes Directory.
WordPress Themes
Based on the nature of the contents, we have to choose the appropriate theme for the site. While selecting the theme, do not go by its stunning appeal, but also consider other important criteria such as:
Number of downloads.
Popularity of the theme.
Ratings by the users.
Any adverse review by the users.
Is it a Responsive Theme suitable for mobiles and tablets.
Since which version theme is existing.
Whether the developer is actively updating the theme or is it dead.
It is important to choose the theme carefully as badly coded theme may severely impact the performance of the site.
Theme Installation
As an example, we show the installation and management of Customizr theme used in codetab.org.
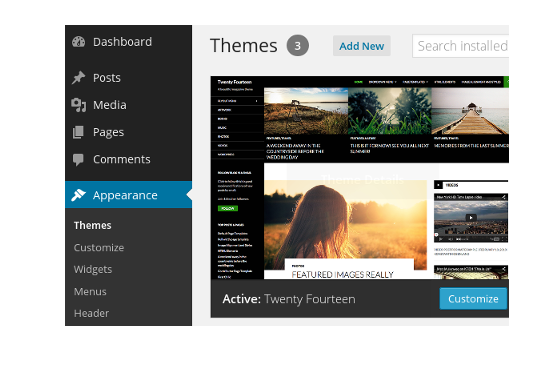
Open Themes screen with Dashboard → Appearance. Themes screen displays the installed themes. To install a new theme, click on Add New and in the Install Themes screen, select Search tab. In search field, enter the keyword Customizr and search.
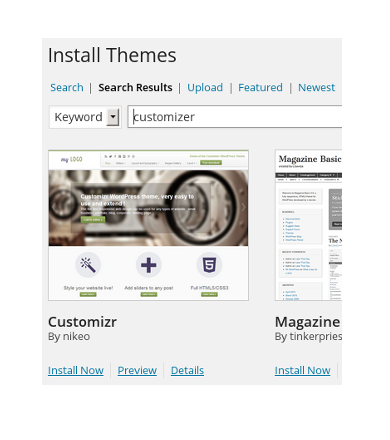
WordPress connects to wordpress.org and shows details about the matching themes. Choose Customizr from displayed item and click Install Now. WordPress fetches the Customizr theme zip file and installs it.
Install Themes screen also has a tab to upload the theme. To use that, we have to download the theme zip archive from WordPress Themes Directory to the PC and then upload.
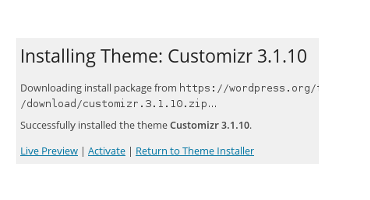
Installing Theme screen shows the installation Progress and once theme is installed successfully, click on Activate to activate the theme.
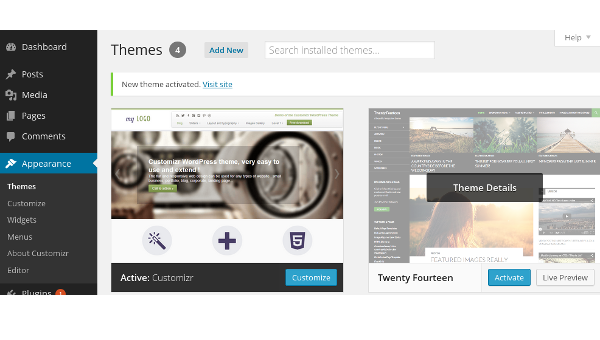
Once theme activated, we are back to Themes screen, which shows Customizr as the active theme.
To delete any unused themes, click on the theme to view the details. Theme Details screen has an option to delete it. Active theme cannot be deleted.
Theme customization
Themes allow extensive setup to change how they appear and behave. Each theme sports a different set of customizable options. For detailed instructions on customization of a theme, you must refer the respective theme’s documentation.
Just to give a flavor of customization, we go through a couple items. Setup screens shown here are of Customizr and obviously, it differs for the theme you have selected. To customize the active theme, select Dashboard → Appearance → Customize.
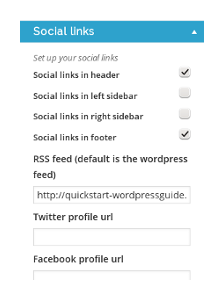
In the Social screen, we set Twitter, Facebook and Google+ profile links and also, setup location of social links in the layout.
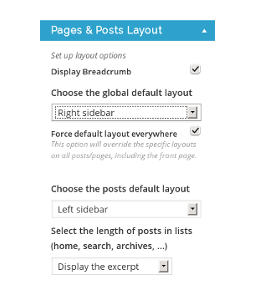
In Pages and Posts Layout, we setup the breadcrumb for navigation, location of vertical sidebar and also, whether to force a default layout everywhere. In codetab.org, we have set Global Default to Right sidebar, where we display AdSense Wide Skyscraper (160px by 600px) ads. We have unchecked Force default everywhere option, so that we can remove the sidebar in some pages; we do not wish to show ads in pages with fewer contents.
WordPress Widgets
WordPress Widget adds contents and features to the sidebars and footer. Stock widgets that come with WordPress are:
Archives - monthly archive of the Posts.
Calendar - calendar of the Posts.
Categories - list or dropdown of categories.
Custom Menu - adds a custom menu to your sidebar.
Meta - login, RSS, & WordPress.org links.
Pages - lists the Pages.
Recent Comments - lists most recent comments.
Recent Posts - lists most recent Posts.
RSS - entries from any RSS or Atom feed.
Search - search form for the site.
Tag Cloud - cloud of the most used tags.
Text - arbitrary text, HTML or JavaScript snippet.
Adding widgets in WordPress is a simple affair. Expand Appearance menu and select Widgets. The left side column of Widgets screen shows the available widgets and the right side column shows locations - Right Sidebar, Left Sidebar, Footer Widget Area One, Two, Three - that can hold widgets.
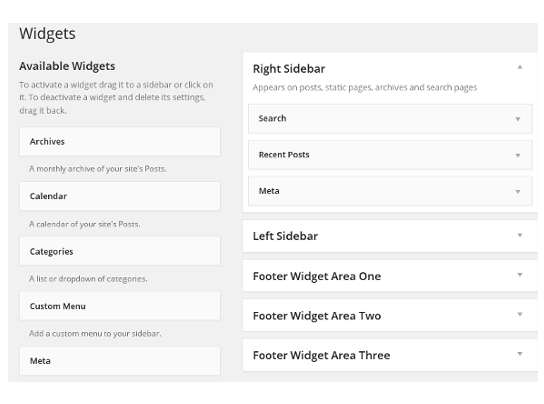
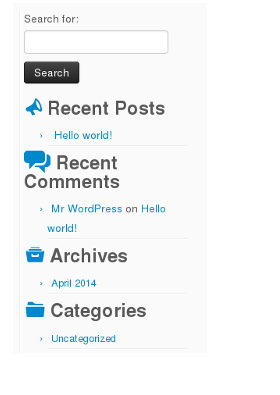
To add a widget, drag it from the Available Widgets panel and drop into the intended sidebar or footer area. In the above screenshot, three widgets - Search, Recent Posts, Meta - are dropped into Right Sidebar. Dropped widgets are expandable, which allows us to set title and tweak widget settings. Text widget is versatile and with it, we can add arbitrary text, HTML or even JavaScript code. We use Text widget to add AdSense JavaScript to the sidebar.
WordPress Menu
WordPress Menu is dependent on the theme we use, yet, its creation and structure are more or less same across many themes. Menu can have Pages, Links and Categories as menu items. Posts can not be a menu item, but we can use a link to add a post to the menu.
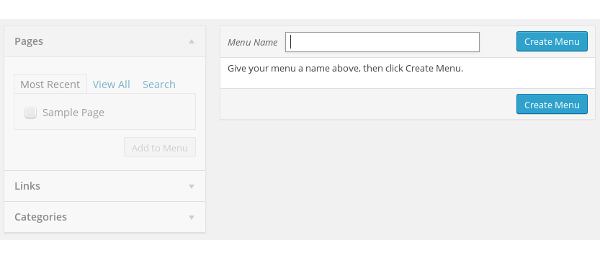
To create menu, open Dashboard → Appearance → Menus. In the Create Menu screen, give a name for menu something like “Main Menu” and click Save Menu.
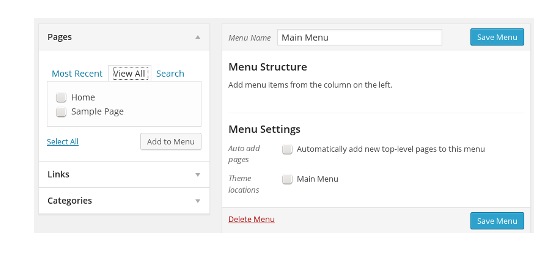
After menu creation, we get Edit Menu screen. Left panel shows the Pages, Links and Categories and right panel shows the Menu Structure. Select View All tab from the Pages and check Home page and click Add to Menu. It adds Home to Menu Structure on the right panel.
Menu items in Menu Structure are drag and drop enabled. Use the feature to adjust the placement and hierarchy of menu items.
Likewise, we can add Post Categories to a menu structure. Using Links option, we can add internal or even, external links to the menu structure. After placing the menu items, set Theme location to Main Menu and save the menu. Menu locations depend on the theme while many supports single location like header, others support multi location.
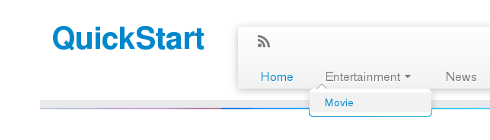
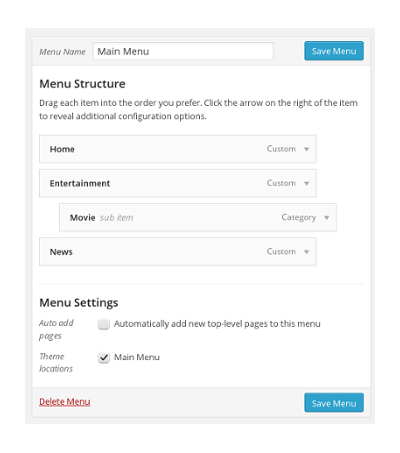
The example menu structure creates a menu as shown in next screen shot. In this menu, menu item, Movie, takes us to the Movie category page that lists the category posts.
Menu Labels

Usually, link menu items open linked resources, either external or internal. Entertainment and News are link menu items, but they just act as menu labels in the menu. Instead of opening the target web page or post, they list sub menu items. To create such menu items we have to use # as the URL.
In the next chapter, we install essential plugins to extend the functionality of the site.